Roblox’s super interactive gaming platform provides an immersive gaming experience to its players. This globally popular platform has about a million users, who, besides playing the game, also have the power to think, create, and share certain in-game items.
One such customization the players could do is create customized Roblox costumes for their customized avatars, the customized in-game character that depicts the game’s players.
Although the game offers various in-game customization options, creating tailor-made Roblox costumes for the avatar would make you stand out among all the other Roblox players.
Creating Roblox costumes and selling them on the platform is one of the easiest methods of earning Robux. Your designed clothing will become popular in the catalog if you are lucky enough. The more it comes into notice, the more Robux you could earn.
If you also want to create something of your own and enjoy the in-game artistic freedom by creating Roblox costumes, then you have landed at the right place.
In this GamePike article, we will share with you how to make Roblox t-shirts, shirts, and pants through Roblox costume templates and monetize them.
Thus, let’s get started with this informative article curated below.
What Are the Roblox Costume Templates?
 Roblox players want to stand out and look unique by showing their individuality and outfits to their fellow players. Creating Roblox costumes is one of the best ways to showcase your creativity and talent to the in-game crowd.
The most essential tool for designing Roblox clothes is the Roblox costumes templates and photo-editing software available online, such as; Paint.Net, Photoshop, GIMP, Photoshop, and many others.
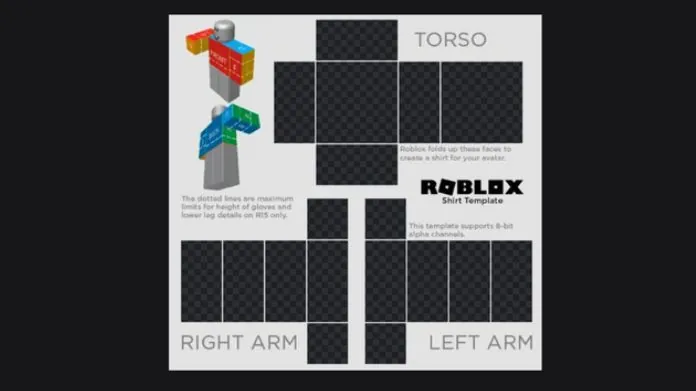
What are clothing templates? They act as a cut-out that gives the user an idea about the clothing design. The templates are like the outlined boxes, which, on folding according to the cut mark, would provide a 3D clothing design for the avatars.
These Roblox costume templates can be downloaded for free from the official website and are thus compatible with all the major photo editing software.
After downloading the template, the developers can add images according to their choices and preferences, thus creating a unique design.
The concluded product can then be saved and uploaded to the Roblox platform, where others can purchase it, and you can earn some Robux.
How to Make Roblox Costumes?
 Before learning how to make custom Roblox costumes, it is first necessary to know the difference between t-shirts and shirts.
In the exciting game of Roblox, shirts and t-shirts are two different clothing pieces. Whereas the t-shirts cover only the torso region of the avatar as if a picture has been pasted there.
On the other hand, shirts and the pant region cover the entire body of the avatar, which includes both the front & back torso region, both the arms & hands of the avatar in the case of shirts and for pants, both left & right legs and the shoe area would be covered.
This Roblox template would give the best avatar an entirely different three-dimensional look to the avatars, making it look more aesthetic and creative.
Move further in this article to know the steps of creating & designing customized Roblox costumes, with which you could flaunt your creative side and artistic skills to your fellow players. But, before the same, complete the process for taking up the Roblox Builder’s Club membership.
Guide to Roblox T-shirt Template
 Creating a Rolox t-shirt is the easiest of all the three templates. If you are a beginner and want to gain first-time experience designing customized Roblox costumes, making t-shirts would be the best.
As there are no trick tips, it would be as easy as pasting a picture in the torso region of the avatar.
How to Make a T-shirt?
Follow the below-listed steps for creating a t-shirt for the avatar.
- The first step would be to create an ideal image of 128 X 128 pixels and save it as a PNG file.
- After making the design, you can download this PNG file through any free online PNG download website. Directly upload and test the same on Roblox.
How Do You Upload the Customized T-shirt?
To upload the customized Roblox costume or t-shirt, follow the below-listed bulleted steps.
- Open the ‘Create’ page on Roblox.
- You will find various options on the left of the newly opened page, such as t-shirts, shirts, and pants.
- From this list, select the t-shirt option. Choose the design or the file you want to upload.
- Give a creative name to the design you created for the Roblox costume.
- Now click on the ‘Upload’ button, and with this step, you can upload a customized Roblox t-shirt on the platform.
Roblox Shirt and Pant Template
 The shirt and the pant template of the Roblox costumes are designed to entirely wrap around the avatar, giving it a 3D look.
The shirt and the pant template in Roblox consists of various boxes with dotted lines on folding, which would provide an idea of the clothes the user decides to develop.
You can easily download the template or the outline for making customized clothes from the official Roblox website or Chrome. Despite downloading, if you have any issues deciphering what the template says, kindly refer to the table listed below.
Before moving towards the table, you must know about certain abbreviations used in the Roblox costume template of shirt and pants and the table drawn below.
- Front- For the front part of the torso
- Back- For the back part of the torso
- F- Front area of both arms and legs
- B- Back area of both arms and legs
- R- Right area of both arms and legs
- L- Left area of both arms and legs
- U- Top of both arms and legs
- D- Bottom of both arms and legs
- Up- Top of the avatar’s torso
- Down- Bottom of the avatar’s torso
- R- Right of the avatar’s torso
- L- Left of the avatar’s torso
Section Size (width & height) Clothing areas(as mentioned in abbreviations in the template)
- Large Squares 128 X 128 pixels Front & Back region
- Small Squares 64 X 64 pixels U & D region
- Tall Rectangle 64 X 128 pixels F, B, L, and R region
- Wide Rectangle 128 X 64 pixels Up, Down, L, and R region
How to Make a Roblox Shirt and Pants?
Follow the steps to make the customized shirt and pants for Roblox.
- Download the Roblox template and open the same in any of the photo editing software of your choice.
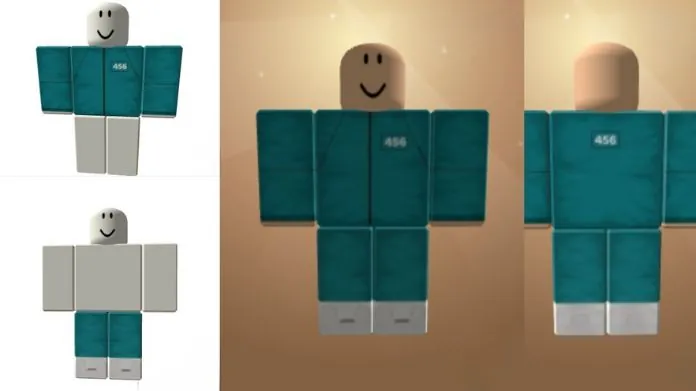
- When you see the template design, you will see that each box represents a different part of the avatar’s body and has a particular size.
- You must apply your chosen image to each body part and adjust it according to the size. Ensure it fits in the template box and fulfills the requirements of the state’s scope. After you finish this, save your design in the format of. PNG and upload the same in Roblox.
How Do You Upload the Designed Shirt and Pants?
Below are steps to upload the customized shirt & pants on the Roblox platform.
- Reach the ‘Create; page of Roblox.
- On the left-hand side, there will be three options to choose from for clothing. Choose the Shirt or the Pant option, whatever you have created and want to upload.
- Choose the file you want to upload and give it a name.
- After this, the last step is to click the ‘Upload’ button.
On completing this step, you will learn how to successfully upload the self-customized Roblox costumes on the platform.
How Do You Test the Designed Roblox Costumes?
Envisioning your creation is essential before uploading it on the Roblox platform. Thus, follow the below-listed steps and carefully read them if you want to test the Roblox clothes yourself.
- Go to the page of Roblox Studio and click on the ‘Plugins’ option.
- Select the ‘ build Rig’ option from the newly opened tab.
- A pop-up menu would appear, from where you could choose the type of rig you want to build in the game or create.
- A basic dummy would appear on the screen.
- Under the ‘explorer’ option in the workspace, click the ‘Dummy’ option with a ‘+’ sign on the right.
- On clicking on this, the players would again be liable to choose from the two options, i.e., the ‘Shirt option’ for t-shirts and the ‘Clothing option’ for the pants and the shirts. Choose whatever you want to try on.
- After this, a new window named’ Properties’ would appear on the screen. This window would further present three options, i.e., Graphic, Shirt Tempelate, Pant Tempelate.
- Next to these options, there are specific rows. Select the one where you want to upload the design created in the PNG format.
- A dummy will appear in the workspace, wearing your clothes.
This is the perfect way to see how your creation will look on the avatar after it is uploaded on the Roblox platform.
How Do You Put a Price on Your Customized Items?
To sell the customized Roblox costumes, you need to have a prime membership of the Roblox account. The clothing items cannot be sold for free.
The developers of the same have to put a price tag on each of the objects designed by them. The minimum price to be quoted for a T-shirt must be at least 2 Robux, and for a shirt or pants, it must be about 5 Robux.
The Robux that the developers earn by selling Roblox costumes and other customizable items is kept in pending status and is only relieved after 30 days for the earner to bring to use.
Below are specific bulleted points that tell you the steps of quoting a price for any customized Roblox item.
- A ‘Create’ option is on the Roblox website’s top bar.
- In the left column, you will find a plethora of various alternatives; choose any one of them for a shirt, t-shirt, or pants. Depending on what you want to sell.
- Your creations would appear, and a gear button would be located to their right.
- Click on Configure > Sales.
- When the sales page opens, click to turn on the ‘Item for sale’ option.
- Enter the desired amount of Robux at which you want to sell your customized Roblox costume to your fellow players.
- After this, hit the sales button.
Frequently Asked Questions
Q. What Are the Primary Requirements for Creating Customized Roblox Costumes?
Ans. The primary requirements for creating customized Roblox costumes are premium membership, clothing templates, and photo-editing software.
Q. What Are Some of the Photo-editing Software That Could Be Used for Creating and Designing Clothing for Avatars?
Ans. For creating clothing and other customizable Roblox items, the developers could use photo-editing software such as; GIMP, Pain.net, and Adobe Photoshop.
Q. What Are Some of the Basic Steps to Create Roblox Costumes?
Ans. Some of the basic steps for creating custom Roblox costumes are:-
- Create a Roblox account and take a Builder’s Club Membership.
- Obtain Robux.
- Navigate to ‘Create a Shirt Screen (or pants or t-shirt, whatever you feel like).
- Download the shirt template.
- Use Photoshop to create custom items.
- Get it approved by trying the same on a dummy
- Upload the same to the Roblox platform and monetize it.
Let’s Wrap Up!
Thus, that was all we had to share with you regarding customized Roblox costumes. This type of clothing will enhance the avatar’s look and allow the developer to showcase his designing talent and skills and earn some in-game currency in the form of Robux.
This process would look tricky at first, but with a lot of trial and error, you will find it amazing to do.
In this article, we share all the best possible information with you. So, wait no further, and start your practice of creating tailor-made Roblox costumes by designing a t-shirt at first.


